
The Double Take Term Conversion Program is going on from Nov 1 through Dec 14, 2012! With this special offer, Kansas City Life Insurance company will give your clients a double conversion credit if applicable when they convert their existing term policy to an eligible permanent life insurance policy.
Since it is Double Take Term Conversion time, I thought I would take some time today to highlight how a conversion illustration can be completed within the Illustration Software.
For example, let's say you have an existing client named "Bob". Bob recently contacted you because he is interested in taking his existing Level 10 Term policy and converting it to a permanent policy. After talking with Bob about his current life insurance needs, lets assume Bob has decided he's interested in seeing an illustration for a Life Protector Universal Life with the LPR premium.
Let's assume this is the information for Bob's Existing Level 10 Term:
Gender: Male
Birthday: 1/1/1980
Risk Class: Standard Non-Tobacco
Specified Amount: $200,000
Double Conversion Credit for $200,000: $100.00
We will use this information to set up the conversion illustration.
Here are a few simple steps you can take to prepare the conversion illustration:
1. The first thing you will want to do is find out what the conversion credit is for the existing policy. You can access this information by contacting New Business at 1-800-572-2467 x8025 and asking for the policy's conversion credit. Once you have determined that the policy is in fact convertible and you have obtained the conversion credit amount, the illustration can be created!
2. To create the illustration, open up the Illustration Software and select the product desired. In this case, we will select the Life Protector for Bob.

3. Next we will input Bob's information, just like we would if we were completing a New Business Illustration. A few things to remember:
- We want to use Bob's birthday to determine the appropriate age. We don't want to use Bob's age when he originally purchased his Level 10. Instead we want to use Bob's attained age.
- We want to use the same risk class that was assigned to Bob for his Level 10.
- If Bob has chosen to convert his entire specified amount, we want to find the conversion credit for that full amount and use that same amount in the illustration.

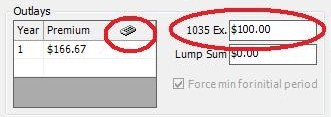
4. Once you have input the client's information, you will then want to enter the conversion credit amount in the 1035 exchange box. Once this is completed, to figure the LPR premium for this case including the conversion credit, click on the Premium Calculator and select "Advanced Premium Guarantee Calculator" in the dropdown. As long as "Use Dump In" is checkmarked, this will take your conversion credit into account when determining the LPR premium.


It's as easy as that! If you have any questions or would like us to assist you in setting up a conversion illustration, just give us a call!
Illustration Development Team
1-800-572-2467 x8162