Followers

Tuesday, November 16, 2021

E-Application: Fixed Annuity

The E-App is available for all fixed annuity products!


Kansas City Life Insurance Company now has a paperless option for submitting applications on all fixed annuity products.  The electronic application, or E-App, is available on the Application for Individual Fixed Annuity.  This intuitive and easy-to-use E-App will help reduce errors and allow for the convenience of electronic signatures.

Find the E-App by clicking on E-Application within the Illustration System menu on www.iKCLife.com.


Have questions on the E-Application process?  On the E-Application Resources page you can read the Agent Guide for a quick step-by-step guide or watch the training video for a demo of the full process!

If you haven't yet ran a fixed annuity quote in the Illustration System read the Running Annuity Illustrations blog post for tips and information.

Thursday, September 30, 2021

E-Application: Ordering Paramedical Exams

Kansas City Life Insurance Company announces a new feature that allows agents to electronically order paramedical exams directly from the E-App.

The new feature can be found near the signature section of the application after 'E-Submit' is clicked.  It is available for full applications when a paramedical exam is required.

In order to complete the exam order, the agent will be linked to ExamOne or APPS.


Agents will need to register online with ExamOne or APPS in order to complete the exam order.  Agents may be required to log in depending on browser settings.

For questions on ExamOne or APPS, please contact the New Business Department at ext. 8025.

Monday, August 30, 2021

Running Annuity Illustrations

Have you ever been meeting with a client when they ask you about annuities, but you don't know where to begin quoting one? Well have no fear, follow these steps and you'll be quoting one of our amazing annuities in no time!

First, you will need to make your way into the Illustration System just as you would for any other quote. We have three fixed annuities, GrowthTrack, SecurityTrack, and the SelecTrack series. There is also one immediate annuity, the Single Premium Immediate Annuity (SPIA). If you need help deciding which product best suits your client, check out our Product Guide, located in the Product Portfolio. Once you have decided on a product, go ahead and select it from the products drop-down in the Illustration System.


Next, you will need to select whether the annuity will be Qualified or Non-Qualified. If you are unsure, please consult a tax advisor to find out which one to choose.


Now, you need to enter the client information. If this is going to be a joint policy, simply hit Annuitant 2 to add the second client. If you have two annuitants and need to remove one, click on the minus button in the red box next to Annuitant 2, as shown below.


You will want to notice that there is less client information collected for annuities than life products. That is because annuities are issued without a risk class, meaning all that is needed is an age/date of birth and gender to do your quote.

Next, you will need to make sure that your premium schedule is set up correctly, give your specific product. Each of product has a different minimum premium amount so you will want to check out the Product Guide, located in the Product Portfolio, if you have any questions about the different product minimums.

You should now be ready to add different payout options to the illustration.


In the drop-down, there are 5 payout options if you have just a single annuitant, and only 2 options if you have a joint case. 


For more information about what these payout options are, please refer to the Product Portfolio. To remove a payout, you will hit the red button with a minus, similar to how you remove an extra annuitant.


If your client wishes to see any sort of income in the illustration, you can add that by hitting the Add Withdrawal button, shown below.


Withdrawals are a little more straight forward than payout amount. Each one withdrawal has a start year, a duration (how many years the withdrawals will last for), and a withdrawal amount. If you accidentally add too many, hit the little red circle with a minus in it to remove the desired withdrawal.


Please note that there is a key difference between adding payout options and doing a withdrawal. Adding a payout to an annuity will show the premium paid out if all of the cash value was transferred into a SPIA while a withdrawal shows money being taken out of the cash value directly. Withdrawals are only available on our fixed annuities.

If doing a quote on one of our fixed annuities, the last thing to do before illustrating is take a look at the Riders section. For these products, there are two riders available. One is the Nursing Home Waiver (NHW), which is required on all fixed annuities so you will not be able to uncheck it. The other is the Lifetime Income Rider (LIR), which is a little more complex and requires certain sections to be filled out. For single annuitants, you will need to decide an age for the income payments to start and the tax bracket rate specific to your client. For joint annuitants, you must do both the income start age and tax rate, but must also check the Joint Rider box. 

Now you are ready to actually illustrate the case. To do this, there are two options, Quick View and Download.

Quick View will give you a basic illustration showing just the calculated numbers. Given you have one of our fixed annuities selected, this will include guaranteed and current cash value growth charts, and the premium schedule. Assuming that you have payout options in your case setup, these will be shown by all annuities. However, the fixed annuities do not have to have a payout option in order to be illustrated.

In the Quick View of the payout options, you will be able to see which option is being illustrated, the amount that being bought, the yearly payout, the income factor, and the exclusion ratio. If you have multiple payout options set up, they will all be illustrated similarly to the picture above.

If you hit Download, the system will download a PDF to your computer and you can open or save it to share with clients. The PDF will contain more product information, along with everything included in the Quick View.

Hopefully this helps get you started quoting Annuities as I'm sure you will be excited for updates that are soon to come! If you have any questions or feedback, please reach out to us at the number or email below.

Thank you!
Illustration Development Team
Kansas City Life
illustrationhelp@kclife.com
1-800-572-2467 x 8162

Friday, July 30, 2021

Product Revision: Value Assured

We are making an update to our beloved whole life plan, Value Assured. Starting August 1st, 2021; the new 2021 version of the product will be live on all Illustration Systems.

There will be two versions of the product listed in the product dropdown.

The one listed Value Assured is the revised 2021 version, and the other one listed Value Assured (2018) is the previous version. All states--with the exception of California--will use the 2021 version of the Value Assured. Until the new 2021 version is approved in California, applications with California as the issue state will use the 2018 version.

There are no major differences between the old 2018 and new 2021 version. The plan works the same way as before, level premium payment until age 100 with insurance lasting until age 120. There are still the three surrender options of Cash Value, Paid-up Insurance, and Extended Term Insurance. But, the rates used in calculating all of the values for the product have been updated.

One new addition you may notice is the option to add the PWP (Purchaser Waiver of Premium) rider on the new version of the Value Assured within the Illustration System on iKCLife.com. This rider has always been available on the Value Assured, but with the new 2021 version coming out, it will be the first time it is illustratable.

This rider works similarly to the WP (Waiver of Premium), but only applicable in cases where there is a separate purchaser (premium payor) other than the primary insured. Premium payments will be waived during a period of total disability of the purchaser or at the death of the purchaser.

For the time being, the PWP rider will only show for the Illustration System on iKCLife. All other versions of our quoting software (Legacy Illustration System and Desktop Illustration System) will not be able to quote the PWP on the Value Assured.

Wednesday, June 30, 2021

When PAC Form Will Be Sent Separately

Ever filled out the banking information on an application only for New Business to tell you they never received it? Well, depending on how you filled out the application, this could be true! However, getting everything complete is as easy as 1-2-3.

When filling out an e-application, there are a number of things that you could do that would require the PAC form to be sent out after the application has been approved from New Business. This is done via the Applications Dashboard (click here if you have questions on the dashboard).

One of the most popular things causing the PAC form to be sent out from the dashboard is doing 'Hold for issue.'


When you check the 'Hold for issue' box, you should notice the information message that pops up informing you that the PAC form will need to be sent out for e-signature through the application dashboard upon approval from New Business. Please note that neither 'Hold for issue' nor 'Add to existing PAC number' need to be checked. They are simply there if that is how you or your client wish to have the application done.

Another way that the PAC form will have to be completed via the applications dashboard is if you have 'Provide Info Later' in the billing information drop down. This means that you do not plan on getting the billing info from the client at this point in time. Rather, you will use the apps dashboard to fill out the PAC form at a later date.


Again, you should notice the information message letting you know the apps dashboard will be used to complete the PAC form.

The last reason that the PAC form would have to be completed through the dashboard is if you have a client that doesn't fit the required age range to collect information now. If the client is over the age of 70 or younger than 15 days old, the policy will be treated as if the 'Hold for issue' box was checked. This means that you will have to use the dashboard to send out the PAC form for e-signature upon the application's approval.

Now, to actually send out the PAC form, you will want to follow these quick steps. First, make your way over to the applications dashboard. Next, open the desired case by clicking anywhere in the gray bar. Lastly, hit the E-Signature button, as shown below.


When you hit this button, a new page will pop up with the PAC information. If you chose to provide the banking info later on the original application, then this is where you will enter that information. If you had already provided the banking info, then you will just have to review that everything is correct. Then there will be a button on that new page to submit the PAC form. This will send the PAC form out to be e-signed by the client, then sent directly to New Business. If you hit the 'Other' button, it means that you plan on getting a wet signature to complete the form. Please note that once you confirm that you are getting a wet signature, the option to do the e-signing will disappear.

Hopefully this clears up a lot of confusion you had on the PAC form! However, if you still have questions, please feel free to contact us and we will gladly help you solve your problems.

Illustration Development Team
1-800-572-2467 x8162
illustrationhelp@kclife.com

Tuesday, June 22, 2021

Fixing a Submitted E-Application

Have you ever filled out an application and sent it out to your client to be signed only for them to come back saying there was a mistake? Well, then you've come to the right place to figure out how to get it fixed!

The first thing you will need to do is head over to your Applications Dashboard and find the case that needs to be fixed. Open the case by clicking on the gray bar and find the options dropdown located in the top right of the case.


In the options dropdown, you will want to hit "Cancel Document". This will cancel the original, incorrect case so it doesn't accidentally get signed and sent into New Business. 

Now back in the options dropdown, hit "Open in Illustration System." This will take you to the illustration, but you won't be able to edit anything. To be able to edit the application, you will need to hit the "Copy Case" button located in the gray menu bar on the left side of the screen.


This will create an exact replica of the case that you had previously submitted. You can now edit the areas that were incorrect and resend the application out for signatures. All parties will have to resign the updated application in order for it to be considered complete and be set off to New Business.

If there are additional questions regarding the resubmission process, please contact us at IllustrationHelp@kclife.com.

Illustration Development Team
1-800-572-2467 x8162
illustrationhelp@kclife.com


Wednesday, May 26, 2021

E-Application: The Signing Process


Looking for a chance to learn more about the E-Signature process? This post will help walk you through the signing process for Kansas City Life Insurance's E-Application.

After filling out the fields in each section of the E-Application, a check mark will appear to indicate that the section is complete. Once every section is marked with a check mark, you are ready to begin the signing process.


If you scroll down to the bottom of the E-Application page, you will find two options: the “View Applications” button and the “E-Signature” button.

The View Applications button will allow you to review the applications with all the entered values filled out. If you click the checkbox to include the illustration, then the document generated can be printed out to be signed as a physical copy that can be mailed to New Business.

The second option begins the e-signature process that allows for the process to be completed completely online instead of using physical signatures. After clicking the “E-Signature” button, a new section will appear on the bottom of the page. This section will prefill the name and email (if it was entered) from the E-Application fields above for each person that requires a signature. In addition, each potential signer is given an option to e-sign through a link sent to the email provided or to use a link that will be generated after submitting the e-application. This can be decided for each individual signer through the indicated checkbox below, checking the box indicates that the signing link will be sent through email.

Worried about sending a signature link to an incorrect email? The email address can be changed on the Applications Dashboard and the signature link resent. For more information on the Applications Dashboard, check out our previous blog post.

After deciding how the signers will receive their signing links, the “Continue” button will take you to the next step and give you an opportunity to review the information one last time before submitting the E-Application.

The confirmation step will show you two lists, one indicating the signers that will be completing the E-Signature in person and the other showing who will be receiving an email instead. If you find anything that needs to be fixed, then clicking the “Edit” button will take you back to the previous view and let you edit any changes, otherwise you are ready to use the “Submit” button to begin the E-Signature process!

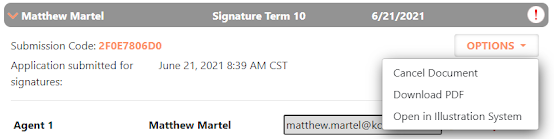
After clicking submit an email from ApplicationSubmission@kclife.com with a hyperlink will be sent to each signer that had requested to receive one. Meanwhile, for each of the remaining signers a link like the image below will be generated. For each person that needs to sign, click their link and pass the computer or tablet for them to start signing.

The first page that you will arrive at after clicking a link will be a welcome page. AssureSign will present you with a brief overview of what steps will follow, simply click the “Continue” button to move onto the next page.

The second page will require each signer to agree to AssureSign’s terms and conditions. This page offers several options for the signer. The “Preview Document” button will give the signer a chance to review the applications and illustration they are about to sign. Next to the “Preview Document” button is a menu button. Clicking the menu button will reveal the option for the signer to send questions or feedback to Kansas City Life Insurance or to Decline Signing the document. If ANY signer declines signing the document, the entire application will be cancelled.

Once the signer is ready to move on, they simply need to check the box agreeing to the terms and conditions and then the “Start Signing” button will be enabled to move onto the next page.

At last we have reached the signing page! Here the signer will be presented with a text box that will represent their signature. It will be prefilled with the name that was used on the application, but it can be changed if desired (e.g. to add a middle name or initial). Below the “Continue” button, a display will indicate how many of the signatures they have completed and how many total signatures they need to apply.

Each time the “Continue” button is clicked, the signature will be applied to the highlighted field, and then scroll the document to the next signature field to be signed.

Once all fields have been signed, the “Continue” button will be changed to a “Finish” button. Click the button to finish the E-Signature process for the signer.

Congratulations! You have just finished the E-Signature process for one of the signers. If you have multiple in person signers, simply close the AssureSign tab and click the signing link to repeat the process for each remaining signer. Once everybody has signed, the completed document will be sent to New Business automatically.

If there are additional questions regarding the E-Signature process, please contact us at IllustrationHelp@kclife.com.

Illustration Development Team
1-800-572-2467 x8162
illustrationhelp@kclife.com