Followers

Wednesday, May 26, 2021

E-Application: The Signing Process


Looking for a chance to learn more about the E-Signature process? This post will help walk you through the signing process for Kansas City Life Insurance's E-Application.

After filling out the fields in each section of the E-Application, a check mark will appear to indicate that the section is complete. Once every section is marked with a check mark, you are ready to begin the signing process.


If you scroll down to the bottom of the E-Application page, you will find two options: the “View Applications” button and the “E-Signature” button.

The View Applications button will allow you to review the applications with all the entered values filled out. If you click the checkbox to include the illustration, then the document generated can be printed out to be signed as a physical copy that can be mailed to New Business.

The second option begins the e-signature process that allows for the process to be completed completely online instead of using physical signatures. After clicking the “E-Signature” button, a new section will appear on the bottom of the page. This section will prefill the name and email (if it was entered) from the E-Application fields above for each person that requires a signature. In addition, each potential signer is given an option to e-sign through a link sent to the email provided or to use a link that will be generated after submitting the e-application. This can be decided for each individual signer through the indicated checkbox below, checking the box indicates that the signing link will be sent through email.

Worried about sending a signature link to an incorrect email? The email address can be changed on the Applications Dashboard and the signature link resent. For more information on the Applications Dashboard, check out our previous blog post.

After deciding how the signers will receive their signing links, the “Continue” button will take you to the next step and give you an opportunity to review the information one last time before submitting the E-Application.

The confirmation step will show you two lists, one indicating the signers that will be completing the E-Signature in person and the other showing who will be receiving an email instead. If you find anything that needs to be fixed, then clicking the “Edit” button will take you back to the previous view and let you edit any changes, otherwise you are ready to use the “Submit” button to begin the E-Signature process!

After clicking submit an email from ApplicationSubmission@kclife.com with a hyperlink will be sent to each signer that had requested to receive one. Meanwhile, for each of the remaining signers a link like the image below will be generated. For each person that needs to sign, click their link and pass the computer or tablet for them to start signing.

The first page that you will arrive at after clicking a link will be a welcome page. AssureSign will present you with a brief overview of what steps will follow, simply click the “Continue” button to move onto the next page.

The second page will require each signer to agree to AssureSign’s terms and conditions. This page offers several options for the signer. The “Preview Document” button will give the signer a chance to review the applications and illustration they are about to sign. Next to the “Preview Document” button is a menu button. Clicking the menu button will reveal the option for the signer to send questions or feedback to Kansas City Life Insurance or to Decline Signing the document. If ANY signer declines signing the document, the entire application will be cancelled.

Once the signer is ready to move on, they simply need to check the box agreeing to the terms and conditions and then the “Start Signing” button will be enabled to move onto the next page.

At last we have reached the signing page! Here the signer will be presented with a text box that will represent their signature. It will be prefilled with the name that was used on the application, but it can be changed if desired (e.g. to add a middle name or initial). Below the “Continue” button, a display will indicate how many of the signatures they have completed and how many total signatures they need to apply.

Each time the “Continue” button is clicked, the signature will be applied to the highlighted field, and then scroll the document to the next signature field to be signed.

Once all fields have been signed, the “Continue” button will be changed to a “Finish” button. Click the button to finish the E-Signature process for the signer.

Congratulations! You have just finished the E-Signature process for one of the signers. If you have multiple in person signers, simply close the AssureSign tab and click the signing link to repeat the process for each remaining signer. Once everybody has signed, the completed document will be sent to New Business automatically.

If there are additional questions regarding the E-Signature process, please contact us at IllustrationHelp@kclife.com.

Illustration Development Team
1-800-572-2467 x8162
illustrationhelp@kclife.com


Tuesday, May 18, 2021

E-Application: Applications Dashboard

Have you ever wanted to see the status of your e-applications or resend signing links after an e-application is submitted? If so, the Applications Dashboard can help you out and do more! Note, once a case reaches New Business, you will need to head over to KCLIC to complete the rest of the pending policy process.

Navigate to the Applications Dashboard via the iKCLife homepage or the new link listed on the Illustration System.


The dashboard shows a list of cases you've submitted as well as the current status of the case. Each case lists some basic information as well as all signers and their signing status.


You can update each signer's email and resend any emails on signers that haven't already signed. Bear in mind, this feature can also be used to send out emails if 'sign in person' was originally selected on e-application. To update a signer's email, click the pencil icon. If you would like the email updated and resent, check the appropriate checkbox and click 'Save and Resend Emails.' Once a signer has completed signing, a checkmark will replace the exclamation point to the right of their email.


Additionally, you can cancel the application, download the pdf, or open the case in the Illustration System via the dropdown in the top right of the expandable section.


Having trouble finding as case? Use the search and filter options listed on the left side of the page!


If you have submitted a case without banking information or elected to hold banking information for issue, you can also use the Applications Dashboard to send the PAC form. These cases are denoted with a dollar sign once the original case has been submitted to New Business. 


We hope this dashboard makes staying on top of e-applications easier!  If there are additional questions regarding the dashboard's functionality, please contact us at IllustrationHelp@kclife.com.

Illustration Development Team
1-800-572-2467 x8162
illustrationhelp@kclife.com

Wednesday, April 28, 2021

IAO Fact Finder: Reimagined

You asked, and we listened! Gone are the days of the clunky, slow, outdated IAO Fact Finder. We've completely revamped this wizard to both look better and work better. Follow me through this example quote to see all of the changes that were made.

Client Info

Client Info Tab

Even though the look is completely updated and new, the process of setting up an IAO quote remains the same. On this first tab you will enter in all of the client's personal information.

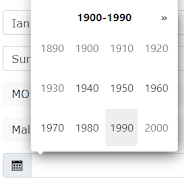
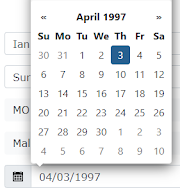
Date Picker by DecadeDate Picker with Date Selected

One special thing about this tab is the Date of Birth field. You can click on the calendar to open up a date picker to select a date instead of typing it out.

Further, when typing in a date, you no longer have to type in each / between the month/day/year!

For example, if you wanted to type in the date 04/03/1997, all you have to type in is "4397" and it will automatically adjust it to the correct format.

Income Needs

Income Needs Tab

The Income Needs tab will have you enter in the client's financial information. The bottom four boxes are automatically calculated from the top four inputs. If you have a question on what something is asking you, click on the arrow next to its name. This will expand an explanation of what the amount is asking for/showing. The image above shows the description on the Payout Duration.

Cash Needs

Cash Needs Tab

The Cash Needs tab is very similar to the Income Needs. Enter in the client's information to help calculate the right payout amount that will fit the client's needs.

Overview

Overview Tab

This last tab summarizes all of the data that was entered on the last two tabs. This is a good spot to double check that all of the information entered is correct. If you do happen to find a mistake, it is seamless to go back to that tab, fix the typo, and then go back to the overview. 

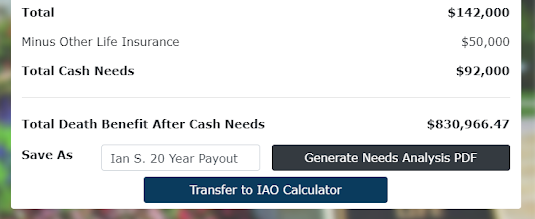
Overview Buttons

Once everything looks good, then you can enter in a name for the case using the "Save As" field and click on "Generate Needs Analysis PDF." This will download a PDF with all of the information that was entered so you can share it with the client.

If the client is happy with the numbers that were generated, go ahead and click on the "Transfer to IAO Calculator" button. This will take all of the information entered into the Fact Finder and transfer it to our IAO Calculator Wizard. From this point all you will have to do is enter in the client's risk class and decide on a product that will best suit their needs. If you want to learn more about the IAO Calculator, click here to read our blog post about it!

View Past Cases (History Page)

View Past Cases Page

Last but not least is the history page where you can view all of your past cases that you have ran. Cases are automatically saved each time "Generate Needs Analysis PDF" or "Transfer to IAO Calculator" is pressed.

This page should look familiar if you have pulled up a past case on the Illustration System. If you have a specific case you are looking for, you can use the search box to find it quickly. Once you are ready to open up a case, just click on its corresponding icon in the "View" column.

If you need to delete a case (or two), check the boxes of the cases you want to delete and click on the "Delete Selected Cases" button. This will remove those cases from your history page.

Wednesday, March 24, 2021

Inforce Search: Term Policies

We've made a small step towards a big enhancement with our Inforce Search on iKCLife. In the past only select ULs could be pulled up in our Inforce System, but now we are adding the ability to pull up certain term policies.

As you can see in our list of available products on the Inforce Search page, the 2005 Level 20 is the only term product that can be pulled up thus far. However, more term products are on their way to be added, so keep your eye out for new additions!

Unlike our ULs that we have in the Inforce System, you will be unable to run inforce illustrations of term polices at this time. Even though you cannot get an inforce illustration, there is still a swath of features you can use within the Inforce Search for these policies.

Once you've pulled up the inforce term you are wanting to look at, you will notice two new lines in the Policy Status section: Level Period End Date and Final Conversion Date.

If you cannot tell by the name, Final Conversion Date is the last day that the term policy can be converted to a permanent plan. Now, you can easily find when the final conversion date will be without having to find the original policy packet or calling the home office.

Level Period End Date will tell you when the policy's level period ends and when it will be entering into yearly renewable premiums. Always take both dates into consideration! Let's use the above policy as an example. Even though it has plenty of years until the final conversion date, the insured will probably want to convert their coverage to a permanent plan before the premiums hike up after the level period ends.

If you are looking to convert the term plan to one of our permanent products, conversion has never been easier with the new conversion button we've added. As you can see from the picture above, you can find it within our side menu underneath Quote.

When pressed, all of the client's personal information and policy information is transferred to a new case within the Illustration System. As an added bonus, we also prefill a bulk of the E-App for you. Never has it been so easy to just select a product and start a Conversion E-App!

If you happen to pull up a term policy and find that it is passed the conversion date, or if the client wants to simply apply for a new term plan; then selecting New Business is the way to go.

Similar to Conversion, all of the client's personal information is transferred to the Illustration System and E-App, but we don't transfer any of the policy information. We leave that up to you and the client to decide on :)

Friday, March 5, 2021

Say Goodbye Quick Quoter and Hello Illustration System

Watch out! As many of you may have noticed, the Quick Quoter has been removed from iKCLife, but do not fear, the Illustration System is here. Over the past few months, we have been working tirelessly to get out a new and improved quoting system for our agents. While the actual functionality did not change much from the Quick Quoter, the Illustration System has a lot of improvements to help make the software as user-friendly as possible. 

One of the first things that should be noted is the homepage has been updated to the link 'Illustration System with Electronic Application'. 


If you prefer to use the Illustrate drop down in the blue header bar, the Quick Quoter has been changed to just be Illustration System.


Now, let's actually get into the updates on the system itself. The first big one is the new sidebar/menu. There are three different variations of how to open the menu depending on your screen size. At the larger sizes, the menu will show all the time and is not collapsable. Once you move down a size, you will see the menu gets collapsed to the left side of the screen. This can be opened up by pressing the little gray box with the double arrow in it.


For the next screen size down, these arrows will disappear and only the word 'Menu' shows up. Similarly, you just need to click the word and the menu will open.


Next, we moved a few buttons that were previously spread out around the page into the menu, most notably the E-Application button. You will also notice we moved away from our tab system. While the pages still work just like the tabs did, they are all now located within the menu. We also put the save, copy, new, and view past cases buttons that were previously much more hidden into this menu.

When pulling up an inforce policy, you will get taken to the Inforce Summary screen. We have moved the buttons to reach the Illustration System. There are two options: 'Inforce' will take you to our Inforce Illustration System, and 'New Business' will take you to our regular Illustration System with all of the client's information transferred over into a new case. 

As for the Illustration System itself, you will notice the entire system has been redone to be more responsive based on your screen size. It ranges from a full sized computer monitor down to a little phone, making it much easier for agents to quote while on the go. The last thing we are going to cover are the updates made to the rider section. In order to get the rider description to show now, click on the rider's name while it is unchecked

To actually add the rider and edit the inputs, you will want to check the desired rider's box. This will cause the gray description box to disappear, the rider name will get highlighted, and the input boxes will appear for riders who need them. This can be collapsed by clicking the rider name (not the check box) to avoid having too cluttered of a page.

Riders that do not need additional inputs, such as the CCB, will not open any sort of input dropdown but the description will still disappear when the rider box is checked.

We hope you enjoy the new and improved Illustration System. If you run into any issues or have any enhancement recommendations, feel free to contact us at the number or email below!!

Illustration Development Team
1-800-572-2467 x8162
illustrationhelp@kclife.com


Thursday, November 19, 2020

SelecTrack Annuities in the Quick Quoter

Earlier this month we released the last of our annuities into the Quick Quoter, the SelecTracks! There are three different versions of the product: the SelecTrack 5, 7, and 10. Follow along as we highlight some of the key features of this product.


To get started, we will cover a few basic descriptions of the product. The SelecTracks are redeterminable guaranteed interest rate annuities. What that means is the initial guaranteed interest rate is set at issue for each policy and applies until the end of the surrender charge period. This period is equal to the number after the SelecTrack. For example, the SelecTrack 5 has a surrender charge period of 5 years.

Once the policy has gotten past the surrender charge period, there are a few options that the client could take: 

  1. withdraw the accumulated value of the policy as a lump sum; 
  2. select one of the available payout options; 
  3. leave the value of the annuity policy on deposit at an interest rate determined annually; or 
  4. apply for a new SelecTrack policy with a new interest rate guarantee period and new surrender charges
Now, there has been a bunch of talk about surrender charges, but we haven't actually gone over what exactly the charge amount is, or when it even applies. For the SelecTracks, an insured may withdrawal up to 10% of the contract value without a surrender charge. One partial surrender is available each contract year without a surrender charge or market value adjustment, beginning in year one. The other option is you may elect to receive automated interest payments or systematic withdrawals. Once these withdrawals exceed 10% of the beginning-of-contract-year value, surrender charges will be assessed. Below is a chart showing the surrender charge percentages based on the product and year.


This chart also reinforces the length of the surrender charge. As mentioned before, you can see the SelecTrack 5 only has charges through year 5, the 7 has charges through year 7, and the 10 has charges through year 10, based on when the percentages zero out in the chart.

Now, head on over to the Quick Quoter and check out our newest addition, the SelecTrack Annuities!

Please don't hesitate to contact us if you have any questions or need help with any step of quoting our annuity products!

Illustration Development Team
1-800-572-2467 x8162
illustrationhelp@kclife.com